Effective Ways to Paper Mache: Create Stunning Craft Projects Today!
Getting Started with Paper Mache Techniques
Are you ready to dive into the creative world of **paper mache**? This versatile craft can transform simple materials into stunning artworks, from masks and sculptures to decorations and more. Understanding **how to paper mache** is essential for beginners and enthusiasts alike. This section will explore basic techniques and preparations necessary to embark on your paper mache projects.
Types of Paper for Mache
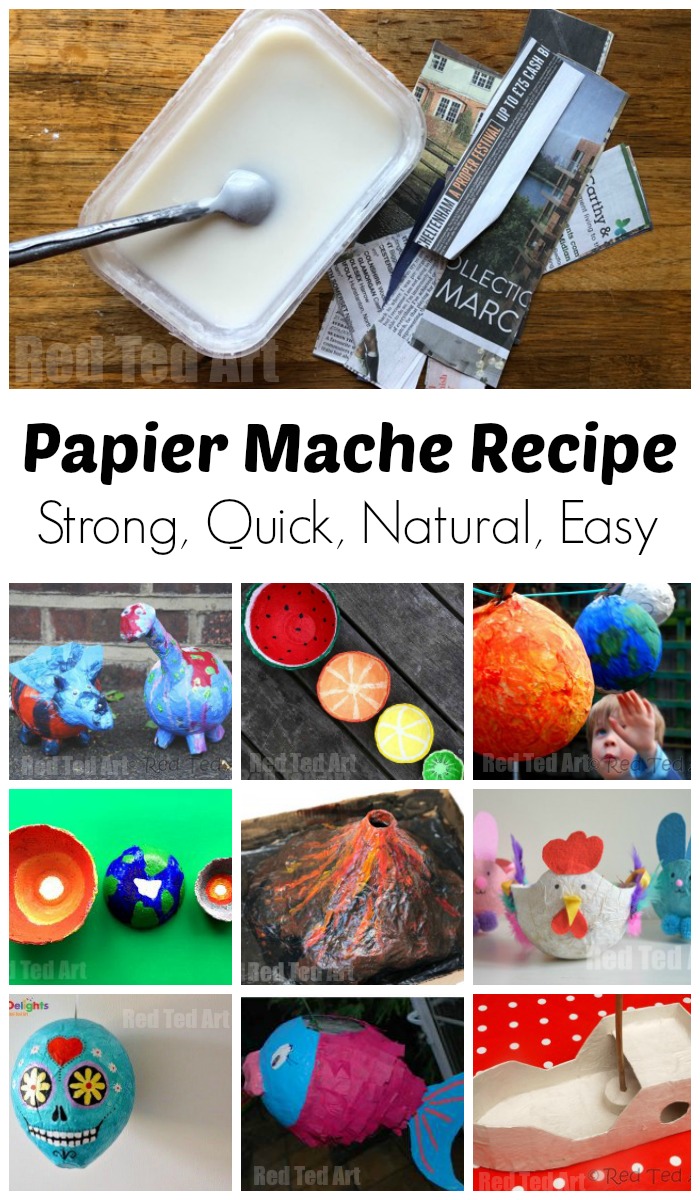
Choosing the right **types of paper for mache** is crucial for the success of your project. You can use newspaper, magazines, or even tissue paper to achieve different textures and effects. **Using newspapers for paper mache** is one of the most common practices due to its strength and availability. If you prefer colorful results, magazines can provide bright hues that capture attention. Lower-quality paper, such as recycled scrap paper, is an excellent eco-friendly choice too. Remember, the thinner the paper, the easier it will be to layer and create intricate designs.
Making Your Own Paper Mache Paste
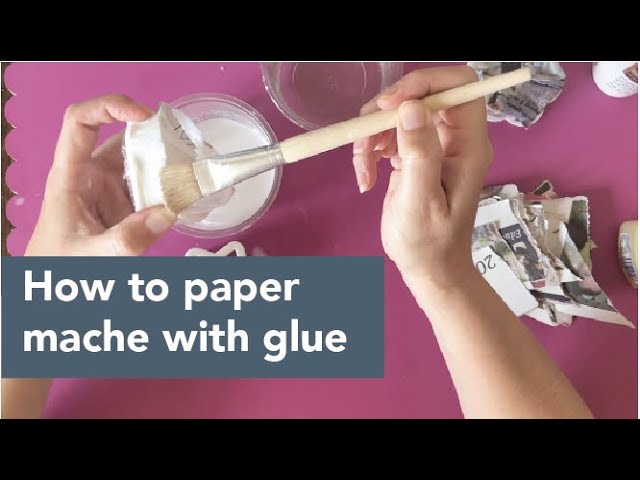
Knowing how to create **paper mache paste** is a vital step when starting. You can either use a flour-based mixture or opt for glue. A simple **paper mache paste recipe** combines one part flour with two parts water, stirred to avoid lumps. Alternatively, using white school glue mixed with water in a 1:1 ratio creates a more robust bond. Each paste type has its advantages, so experiment to see which works best for your desired outcome!
Basic Instructions for Paper Mache
Now let’s discuss the **paper mache instructions** for beginners. Start by preparing a workspace (a covered table would be ideal), as this craft can be messy. Tear your preferred paper into strips (about 1 inch wide) for easy application. Dip the strips in your paste, ensuring each one is fully coated and excess paste is removed. Apply the wet strips to your chosen mold or surface, layering multiple strips to achieve strength. Allow each layer to dry completely before adding the next, preferably 24 hours for thick applications.
Paper mache can be immensely rewarding, especially when you see your ideas take shape. Make sure to pay attention to the drying times, as **how to dry paper mache** properly plays a crucial role in the structural integrity of your final piece.
Creating Stunning Paper Mache Projects
After mastering the basic techniques, it’s time to channel your creativity with exciting **paper mache projects**. This section will focus on various innovative crafts that you can create, whether for home decor, art pieces, or educational ventures.
Inspiring Paper Mache Sculptures
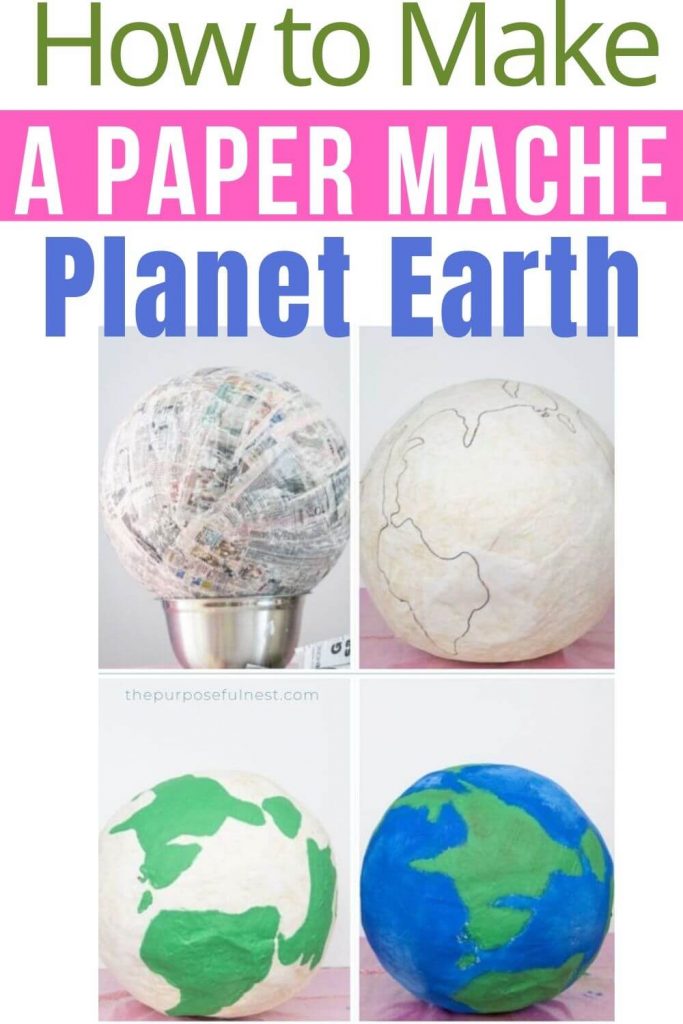
One inspiring **paper mache art** form is sculptures. Using balloons as a base is a fantastic way to create hollow shapes which can later be popped or cut away. For example, once the sculpture is dry, you can use vibrant paints and finishes to add a personalized touch. Projects such as mascot statues, themed decorations, or even life-sized figures are all achievable with skill and patience. These **paper mache sculptures** can be used for special occasions or just as unique statements in your living space.
Fun Paper Mache for Kids
Paper mache is an excellent craft for kids, facilitating both learning and creativity. Engage children in ways to create **paper mache animals**, masks, or even simple bowls. It’s a great avenue for teaching concepts of recycling as kids can use scrap paper. Make it a family fun day moving towards eco-friendly crafting and creating memories while enhancing fine motor skills. Young creators can simply tear, paste, and paint their fantastic creations!
Unique Paper Mache Decorations
If you are looking for **paper mache ideas** for seasonal celebrations, there are countless decoration projects to explore. Think of **paper mache masks** for Halloween or colorful forms for birthday parties. For a casual get-together, consider crafting cheerful centerpieces using **paper mache bowls** decorated with vibrant colors for added flair. Having unique decorations engages guests and makes the occasion memorable.
Advanced Techniques and Finishing Touches for Paper Mache
As you become more confident in your crafting skills, exploring more advanced **paper mache techniques** for detailed finishes can transform your projects. This section covers methods to repair, finish, and seal your paper mache pieces for extra durability and beauty.
Repairing and Finishing Paper Mache
When crafting, wear and tear can happen. Knowing how to **repair paper mache** is essential to keep your artwork intact. Minor cracks can be fixed by carefully applying a fresh layer of paste over the area and smoothing it down. Additionally, finishing your piece involves sanding rough edges and adding a hi-gloss sealer for a professional look. **Sealing paper mache** adds durability against moisture and enhances its lifespan significantly.
Experimenting with Colors in Paper Mache
Create eye-catching pieces by learning **how to colored paper mache**. Paint your creations with water-based acrylics or spray paints – both mediums yield vibrant results. You can also explore **paper mache with tissue paper**, which offers a more translucent finish for artistic flair. Layering different colors can bring depth to your project, allowing you to create visually appealing masterpieces.
Using Mixed Media Techniques
For a unique twist on traditional crafting, consider combining **paper mache and mixed media**. Integrating items like beads, fabric, or even recycled materials can enhance the overall design. This technique allows for personal expression and makes your pieces one-of-a-kind. As you incorporate various materials, think about textures and patterns that will bring life to your work.
Key Takeaways
- Explore different **paper mache recipes** and techniques to get started on your projects.
- Engaging in **paper mache for kids** stimulates creativity and hands-on learning.
- Repair your creations and apply finishes to ensure durability and aesthetics.
- Experiment with color and mixed media to take your **paper mache crafts** to the next level.
FAQ
1. What is the best paper for paper mache?
The choice of paper can vary depending on the project, but generally, newspapers are favored for their strength and flexibility. If you want more vibrant results, using magazines or tissue paper can enhance your artwork’s visual appeal. Each type of paper contributes a different texture to the finished product, so feel free to experiment!
2. Can I use glue instead of flour for paper mache paste?
Yes! **Using glue for paper mache** is a popular alternative to flour-based paste. A mixture of white school glue and water in equal parts provides a strong adhesive perfect for holding the layers together, especially when using finer papers or creating detailed objects.
3. How can I seal my paper mache projects?
To **seal paper mache** effectively, use a clear, water-based sealer or varnish once your project is fully dry. This will protect it from moisture, enhance colors, and provide a professional finish. Make sure to follow the manufacturer’s instructions for the best results!
4. Are there safe methods for children to use paper mache?
Yes! Always supervise children when working on **paper mache crafts**. Opt for non-toxic glues and safe scissors for cutting paper. In addition, encourage outdoor crafting to avoid messes inside the home. Engaging in **safe crafting techniques** will make it an enjoyable experience for everyone.
5. What are creative ways to display my paper mache art?
Displaying your **paper mache art** creatively can include hanging pieces on walls, using stands for sculptures, or placing colorful bowls and decorations around your home. Consider creating a designated space for your crafts – showcasing your work can keep the creative spirit alive at home!
6. How long does paper mache take to fully dry?
The drying time for paper mache projects varies based on the thickness of the layers. Generally, it can take about 24 hours for thin layers to dry, but for various multiple layers or larger projects, it may take up to several days. Be patient for a solid end result!
7. Can I make eco-friendly homemade paper mache?
Absolutely! You can create eco-friendly **paper mache** by using recycled paper and water instead of commercial puffed pastes and glues. This sustainable practice not only saves resources but can be a fun activity teaching kids about recycling and creativity.